By Chris Siciliano
This past winter my grandfather and I made plans to build a wood-fired mud oven on his property in the wilds of Northern Michigan. We bought a how-to book (see above) and began telling everyone about the pizza and bread we would bake once the oven was complete. When May rolled around, it occurred to us that we were actually going to have build this thing. To ensure we did it right we decided to build a small test oven on which to practice and make mistakes. It's a good thing we did. Thanks to a number of lessons learned from building what we now call "mini oven", the larger, permanent version should be all the more successful.
See below for a short recap of the prototype oven build. To see how the permanent oven turns out, please stay tuned.
In the above picture, my grandfather and I are packing layers of mud around a gumdrop-shaped mold made from wet sand and covered with damp newspaper. The mud and sand are resting on a layer of fire bricks, the fire bricks are sitting on a base of cinder blocks, and the cinder blocks are sitting directly on the ground, far enough from foot traffic not to get in anybody's way.
I found the fire bricks at Belden Brick & Supply in Grand Rapids for $1.35 each. Apparently the bricks can withstand temperatures upwards of 2200F, perfect for an oven floor. The cinder blocks were just something the old man had laying around the property. If the look of cinder blocks doesn't appeal to you -- and I can see why it wouldn't -- Kiko Denzer's book has a section on more elaborate and better looking foundations.
The sand mold is only a temporary structure, built to lend shape and give support to the mud packed around it. Once the mud walls are complete, the oven door is cut and the sand can be removed.
The initial batch of mud I mixed was too soft and wet; it needed less water or more building soil. The lower layers kept collapsing under the weight of the mud that went on top. If not for my cousin Jacob's ingenious idea to build a mold from pieces of scrap wood and rope, the whole thing would have oozed right off the foundation. For the next oven, we need to pay better attention to the consistency of the building mud. Overly wet material is not impossible to work with, but it makes the build more difficult than it needs to be. Lesson learned.
(Jacob is the head brewer at Brewery Vivant. No doubt his problem-solving skills are one reason why his beers are so good.)
Being Memorial Day Weekend, there was an abundance of family around to help with the construction. This came in handy at times and other times not so much. Handy: my grandmother, a gifted artist, pitching in to help sculpt the mud layer. Handy: my great Uncle Sonny sharing advice from his days as a cement worker (he also donated the building soil). Not so handy: my brother Dominic's non-stop one-liners regarding the oven's shared resemblance with elephant droppings.
In all fairness to Dominic, he did sort of help fill a wheelbarrow almost full with dirt. Thanks bro. Much appreciated.
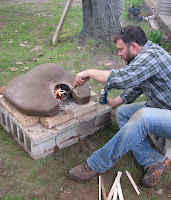
All told, from start to finish, we put about four hours work into the actual build. We let the oven dry in the sun for a few hours and then cut away the door, dug out the sand, lit a fire, and hoped for the best. In my haste I packed too much fuel into the oven and it didn't burn very well the first night. The next morning I raked out the coals and ashes -- some of which were still smoldering -- and started again with a small, clean fire. The new fire burned like crazy, drawing well and heating evenly.
At the time of this writing, we have yet to bake bread or pizza in the new oven. Hopefully by this weekend or the next. I also had not planned on adding any layers of insulation (clay and sawdust, mud and straw). In fact I had originally planned on tearing this first oven down almost immediately. My family informs me this decision is not a good one; they say lets keep the test oven no matter that we're still building a larger one. Might as well. Some closing notes...
- The oven space at the floor is 16" in diameter, big enough to bake one large loaf of bread or maybe two small ones. The ceiling is roughly 11.5" high.
- The oven was a full day's work. But it was good work, not overly complicated, easy to get the hang of, something you can do with the whole family or some friends. With a little planning and help, one could easily build a basic backyard oven in a weekend. We did. And if we can do it, believe me, you can do it too.
- We still need to fashion an oven door somehow, from a wood plank or other found material. Uncle Sonny suggested that an old mailbox door just might do the trick.
- If you have built an oven yourself and learned some things along the way, we'd love to hear from you. Please post your comments below.
- More to come soon!
Chris Siciliano is a writer, teacher, and the managing editor of The Buzz. He lives in Grand Rapids, MI, where one day he hopes to build a house completely out of dirt (adobe).


No comments:
Post a Comment